今天,学习下Flutter中的国际化多语言配置方案.
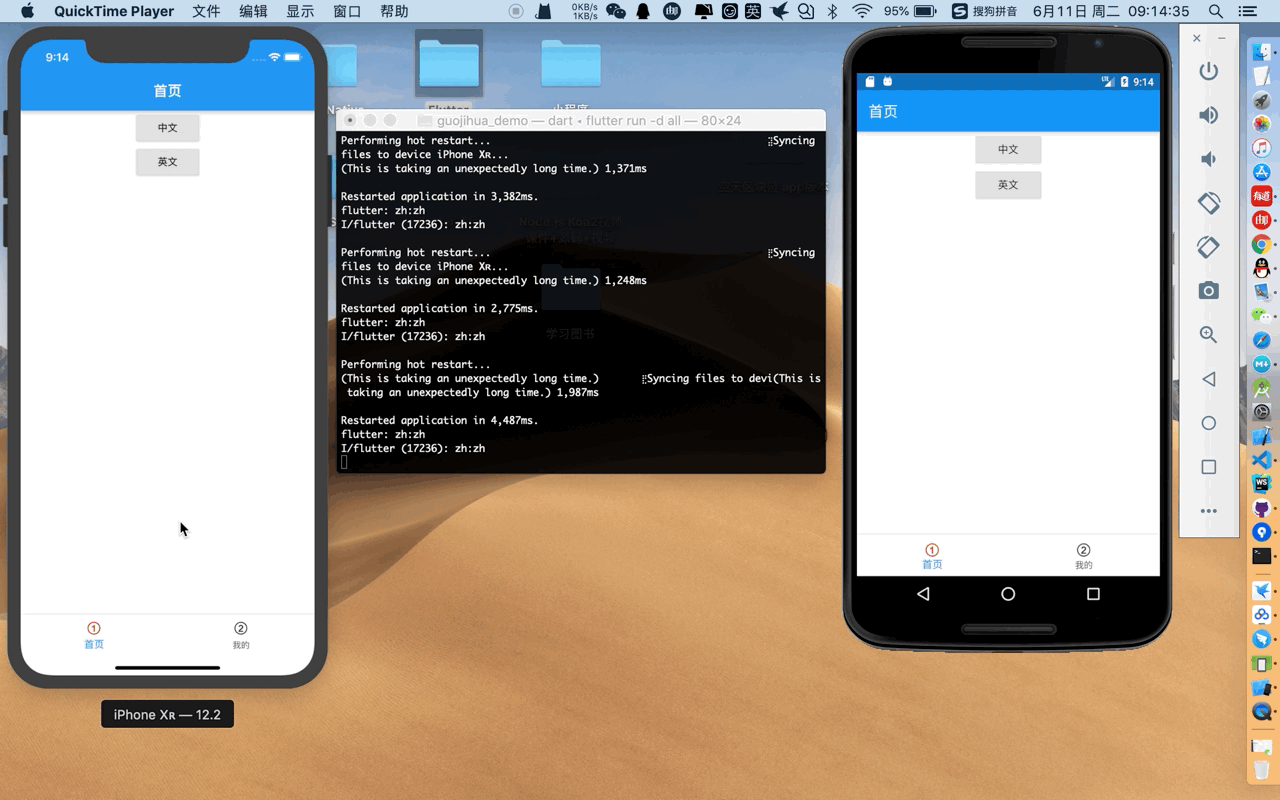
原教程地址 ,本猿按照该大神的方案成功实现了需求,在此记录一下.本来在网上搜索了很多教程博客,要么一堆截图下来,最后两个字成功,要么一片片的代码片段,最后两个字成功,我均试了下,全是取值为空的错误.可能本猿少了哪几步操作吧.所幸在朋友的帮助下,实现了该方案,也找到了该方案的原大佬.先行上图:
效果图:
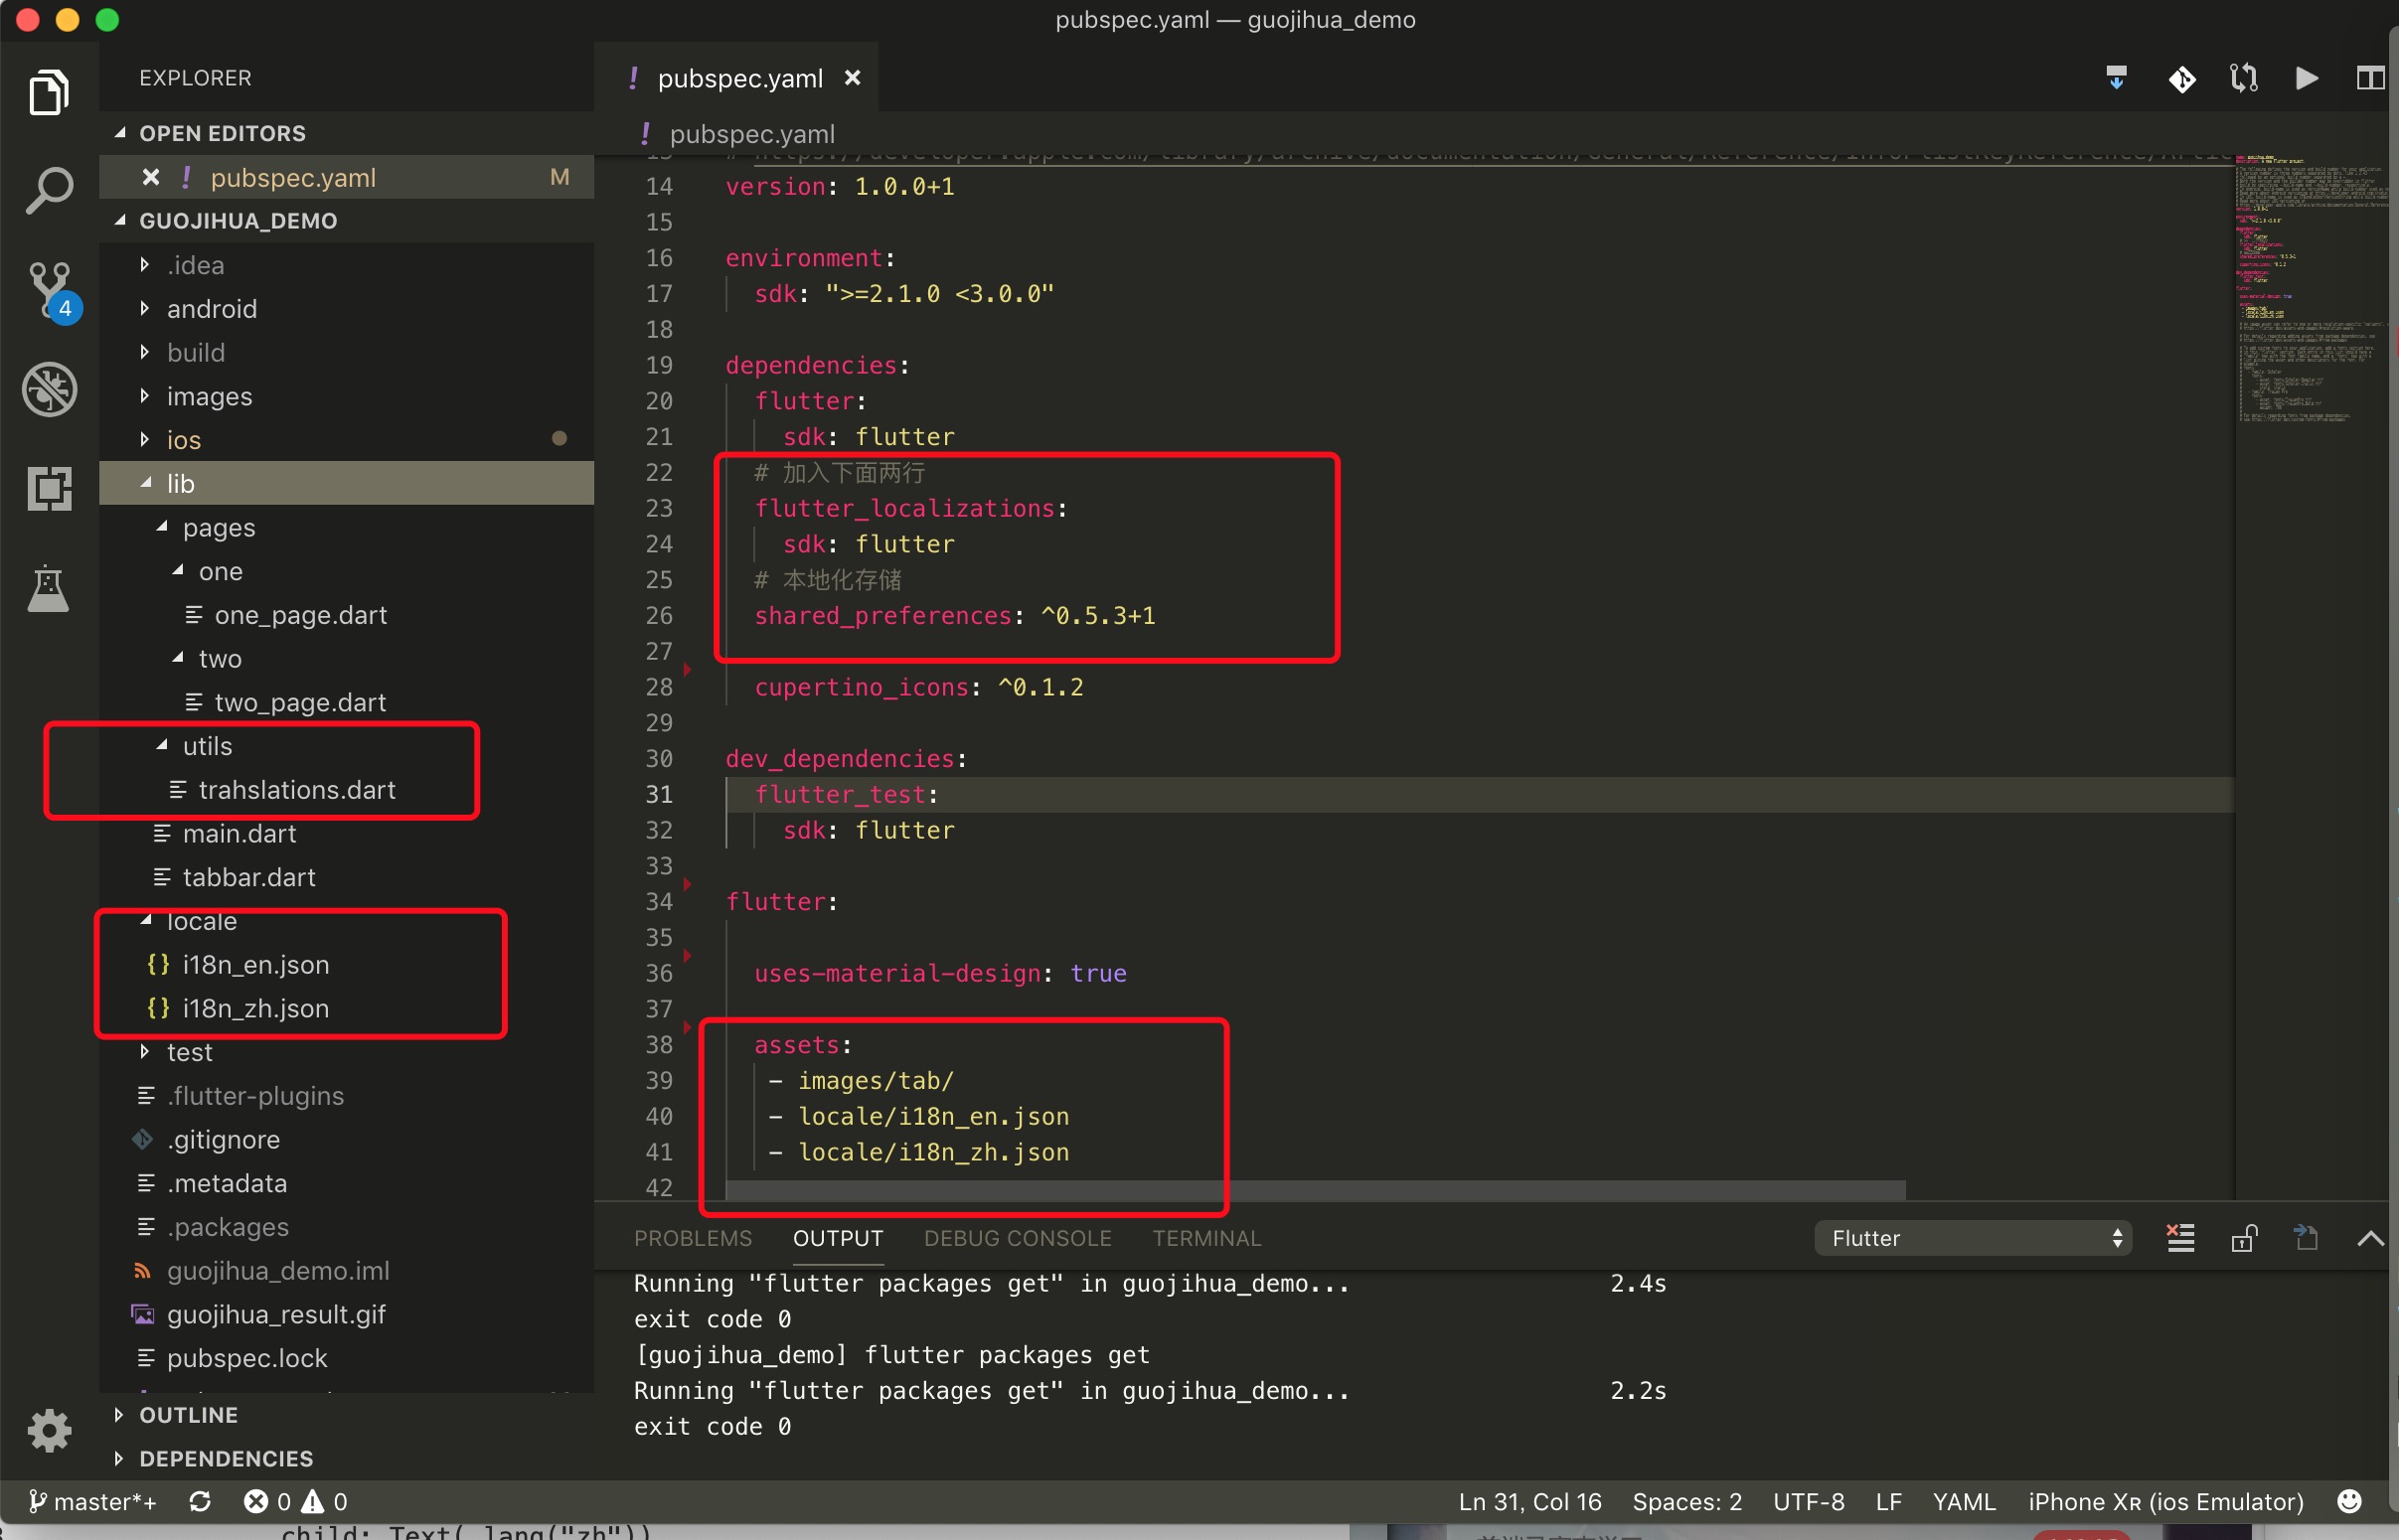
此方案使用到了下面的两个库,一个国际化库,一个本地存储库(做持久化语言操作).
Flutter的使用版本和代码结构如图:
首先我们新建两个语言json文件,里面配置各自平台需要的文字,如下所示.
i18n_en.json
1
2
3
4
5
6
7
{ "register": "register", "mine": "mine", "home": "home", "zh": "zh", "en": "en" }
i18n_zh.json
1
2
3
4
5
6
{ "mine":"我的", "home":"首页", "zh":"中文", "en": "英文" }
然后新建最重要的配置文件trahslations.dart
trahslations.dart
1
2
3
4
5
6
7
8
9
10
11
12
13
14
15
16
17
18
19
20
21
22
23
24
25
26
27
28
29
30
31
32
33
34
35
36
37
38
39
40
41
42
43
44
45
46
47
48
49
50
51
52
53
54
55
56
57
58
59
60
61
62
63
64
65
66
67
68
69
70
71
72
73
74
75
76
77
78
79
80
81
82
83
84
85
86
87
88
89
90
91
92
93
94
95
96
97
98
99
100
101
102
103
104
105
import 'dart:async'; import 'dart:convert'; import 'package:flutter/material.dart'; import 'package:flutter/services.dart' show rootBundle; import 'package:shared_preferences/shared_preferences.dart'; /// 自定义的Translations类 class Translations { Translations(Locale locale) { this.locale = locale; _localizedValues = null; } Locale locale; static Map<dynamic, dynamic> _localizedValues; static Translations of(BuildContext context){ return Localizations.of<Translations>(context, Translations); } String text(String key) { if(_localizedValues==null) { return "no locale"; } return _localizedValues[key] ?? '** $key not found'; } static Future<Translations> load(Locale locale) async { SharedPreferences sp = await SharedPreferences.getInstance(); String lang = sp.get("lang"); if(lang==null) { lang = "zh"; } print('zh:$lang'); Translations translations = new Translations(locale); String jsonContent = await rootBundle.loadString("locale/i18n_$lang.json"); _localizedValues = json.decode(jsonContent); applic.shouldReload = false; return translations; } get currentLanguage => locale.languageCode; } /// 自定义的localization代表,它的作用是在验证支持的语言前,初始化我们的自定义Translations类 class TranslationsDelegate extends LocalizationsDelegate<Translations> { const TranslationsDelegate(); /// 改这里是为了不硬编码支持的语言 @override bool isSupported(Locale locale) => applic.supportedLanguages.contains(locale.languageCode); @override Future<Translations> load(Locale locale)=> Translations.load(locale); @override bool shouldReload(TranslationsDelegate old) => false; } /// Delegate类的实现,每次选择一种新的语言时,强制初始化一个新的Translations类 class SpecificLocalizationDelegate extends LocalizationsDelegate<Translations> { final Locale overriddenLocale; const SpecificLocalizationDelegate(this.overriddenLocale); @override bool isSupported(Locale locale) => overriddenLocale != null; @override Future<Translations> load(Locale locale) => Translations.load(overriddenLocale); @override bool shouldReload(LocalizationsDelegate<Translations> old) { return applic.shouldReload??false; } } typedef void LocaleChangeCallback(Locale locale); class APPLIC { // 支持的语言列表 final List<String> supportedLanguages = ['en','zh']; // 支持的Locales列表 Iterable<Locale> supportedLocales() => supportedLanguages.map<Locale>((lang) => new Locale(lang, '')); // 当语言改变时调用的方法 LocaleChangeCallback onLocaleChanged; bool shouldReload; /// /// Internals /// static final APPLIC _applic = new APPLIC._internal(); factory APPLIC(){ return _applic; } APPLIC._internal(); } APPLIC applic = new APPLIC();
在里面,我们自定义一个Translations类,里面使用 Locale初始化语言配置,且默认给的汉语zh,可以添加自己支持的Locales列表,新建对应的json文件即可.
接下来需要在入口配置Delegate的相关代码:
main.dart
1
2
3
4
5
6
7
8
9
10
11
12
13
14
15
16
17
18
19
20
21
22
23
24
25
26
27
28
29
30
31
32
33
34
35
36
37
38
39
40
41
42
43
44
45
46
47
48
49
50
51
52
53
54
55
56
57
58
59
60
61
62
import 'package:flutter/material.dart'; import 'package:shared_preferences/shared_preferences.dart'; import 'package:flutter_localizations/flutter_localizations.dart'; import './utils/trahslations.dart'; import './tabbar.dart'; void main() => runApp(MyApp()); class MyApp extends StatefulWidget { MyApp({Key key}) : super(key: key); _MyAppState createState() => _MyAppState(); } class _MyAppState extends State<MyApp> { SpecificLocalizationDelegate _localeOverrideDelegate; onLocaleChange(Locale locale) async { print('onLocaleChange--'); SharedPreferences sp = await SharedPreferences.getInstance(); await sp.setString("lang", locale.languageCode); setState(() { _localeOverrideDelegate = new SpecificLocalizationDelegate(locale); }); } @override void initState() { super.initState(); _localeOverrideDelegate = new SpecificLocalizationDelegate(null); applic.onLocaleChanged = onLocaleChange; } @override Widget build(BuildContext context) { return MaterialApp( debugShowCheckedModeBanner: false, title: 'box chain', theme: new ThemeData( backgroundColor: Color.fromRGBO(240, 240, 240, 1.0), ), home: MainPageWidget(), localizationsDelegates: [ _localeOverrideDelegate, const TranslationsDelegate(), GlobalMaterialLocalizations.delegate, GlobalWidgetsLocalizations.delegate, ], supportedLocales: applic.supportedLocales(), localeResolutionCallback: (deviceLocale, supportedLocales) { if(deviceLocale.toString() == 'en_CN'||deviceLocale.toString() == 'zh_CN'){ applic.shouldReload = true; applic.onLocaleChanged(new Locale('zh','')); } else { applic.shouldReload = true; applic.onLocaleChanged(new Locale('en','')); } } ); } }
这里,我们先引入本地化库,国际化库和刚才新建的trahslations.dart,然后在初始化方法里面初始化配置,在MaterialApp里面设置localizationsDelegates和supportedLocales,然后新建一个方法用于修改本地的Locale.onLocaleChange方法.
下面就是使用方法了:1 2 3 4 5 6 String _lang(String key) { return Translations.of(context).text(key); } _lang("zh")
1 2 3 applic.shouldReload = true; applic.onLocaleChanged(new Locale('zh', ''));
完整代码:
one_page.dart
1 2 3 4 5 6 7 8 9 10 11 12 13 14 15 16 17 18 19 20 21 22 23 24 25 26 27 28 29 30 31 32 33 34 35 36 37 38 39 40 41 import 'package:flutter/material.dart'; import '../../utils/trahslations.dart'; class OnePage extends StatefulWidget { @override _OnePageState createState() => _OnePageState(); } class _OnePageState extends State<OnePage> { String _lang(String key) { return Translations.of(context).text(key); } Widget build(BuildContext context) { return Scaffold( appBar: AppBar( title: Text(_lang("home")), ), body: Center( child: Column( children: <Widget>[ RaisedButton( child: Text(_lang("zh")), onPressed: () { applic.shouldReload = true; applic.onLocaleChanged(new Locale('zh', '')); }, ), RaisedButton( child: Text(_lang("en")), onPressed: () { applic.shouldReload = true; applic.onLocaleChanged(new Locale('en', '')); }, ), ], ), ), ); } }
two_page.dart
1 2 3 4 5 6 7 8 9 10 11 12 13 14 15 16 17 18 19 20 21 22 23 24 import 'package:flutter/material.dart'; import '../../utils/trahslations.dart'; class TwoPage extends StatefulWidget { @override _TwoPageState createState() => _TwoPageState(); } class _TwoPageState extends State<TwoPage> { String _lang(String key) { return Translations.of(context).text(key); } @override Widget build(BuildContext context) { return Scaffold( appBar: AppBar(title: Text(_lang("mine"))), body: Center( child: Text('........'), ), ); } }
其中tabbar的代码中,引入类trahslations.dart,使用如下:
1 2 3 4 5 6 7 8 9 10 11 import './utils/trahslations.dart'; Text getTabTitle(int curIndex) { if (curIndex == _tabIndex) { return new Text(Translations.of(context).text(appBarTitles[curIndex]), style: new TextStyle(fontSize: 14.0, color: const Color(0xff1296db))); } else { return new Text( Translations.of(context).text( appBarTitles[curIndex]), style: new TextStyle(fontSize: 14.0, color: const Color(0xff515151))); } }
完整代码:
tabbar.dart
1 2 3 4 5 6 7 8 9 10 11 12 13 14 15 16 17 18 19 20 21 22 23 24 25 26 27 28 29 30 31 32 33 34 35 36 37 38 39 40 41 42 43 44 45 46 47 48 49 50 51 52 53 54 55 56 57 58 59 60 61 62 63 64 65 66 67 68 69 70 71 72 73 74 75 76 77 78 79 80 81 82 83 84 85 86 87 88 89 90 91 92 93 94 95 96 97 98 99 100 101 102 import 'package:flutter/material.dart'; import './utils/trahslations.dart'; import './pages/one/one_page.dart'; import './pages/two/two_page.dart'; class MainPageWidget extends StatefulWidget { @override State<StatefulWidget> createState() { return new MainPageState(); } } class MainPageState extends State<MainPageWidget> { int _tabIndex = 0; var tabImages; var appBarTitles = ['home', 'mine']; /* * 存放二个页面,跟fragmentList一样 */ var _pageList; /* * 根据选择获得对应的normal或是press的icon */ Image getTabIcon(int curIndex) { if (curIndex == _tabIndex) { return tabImages[curIndex][1]; } return tabImages[curIndex][0]; } /* * 获取bottomTab的颜色和文字 */ Text getTabTitle(int curIndex) { if (curIndex == _tabIndex) { return new Text(Translations.of(context).text(appBarTitles[curIndex]), style: new TextStyle(fontSize: 14.0, color: const Color(0xff1296db))); } else { return new Text( Translations.of(context).text( appBarTitles[curIndex]), style: new TextStyle(fontSize: 14.0, color: const Color(0xff515151))); } } /* * 根据image路径获取图片 */ Image getTabImage(path) { return new Image.asset(path, width: 24.0, height: 24.0); } void initData() { /* * 初始化选中和未选中的icon */ tabImages = [ [ getTabImage('images/tab/home.png'), getTabImage('images/tab/home_active.png') ], [ getTabImage('images/tab/mine.png'), getTabImage('images/tab/mine_active.png') ], ]; /* * 子界面 */ _pageList = [ new OnePage(), new TwoPage(), ]; } @override Widget build(BuildContext context) { //初始化数据 initData(); return Scaffold( body: _pageList[_tabIndex], bottomNavigationBar: new BottomNavigationBar( items: <BottomNavigationBarItem>[ new BottomNavigationBarItem( icon: getTabIcon(0), title: getTabTitle(0)), new BottomNavigationBarItem( icon: getTabIcon(1), title: getTabTitle(1)), ], type: BottomNavigationBarType.fixed, //默认选中首页 currentIndex: _tabIndex, iconSize: 24.0, //点击事件 onTap: (index) { setState(() { _tabIndex = index; }); }, ), ); } }
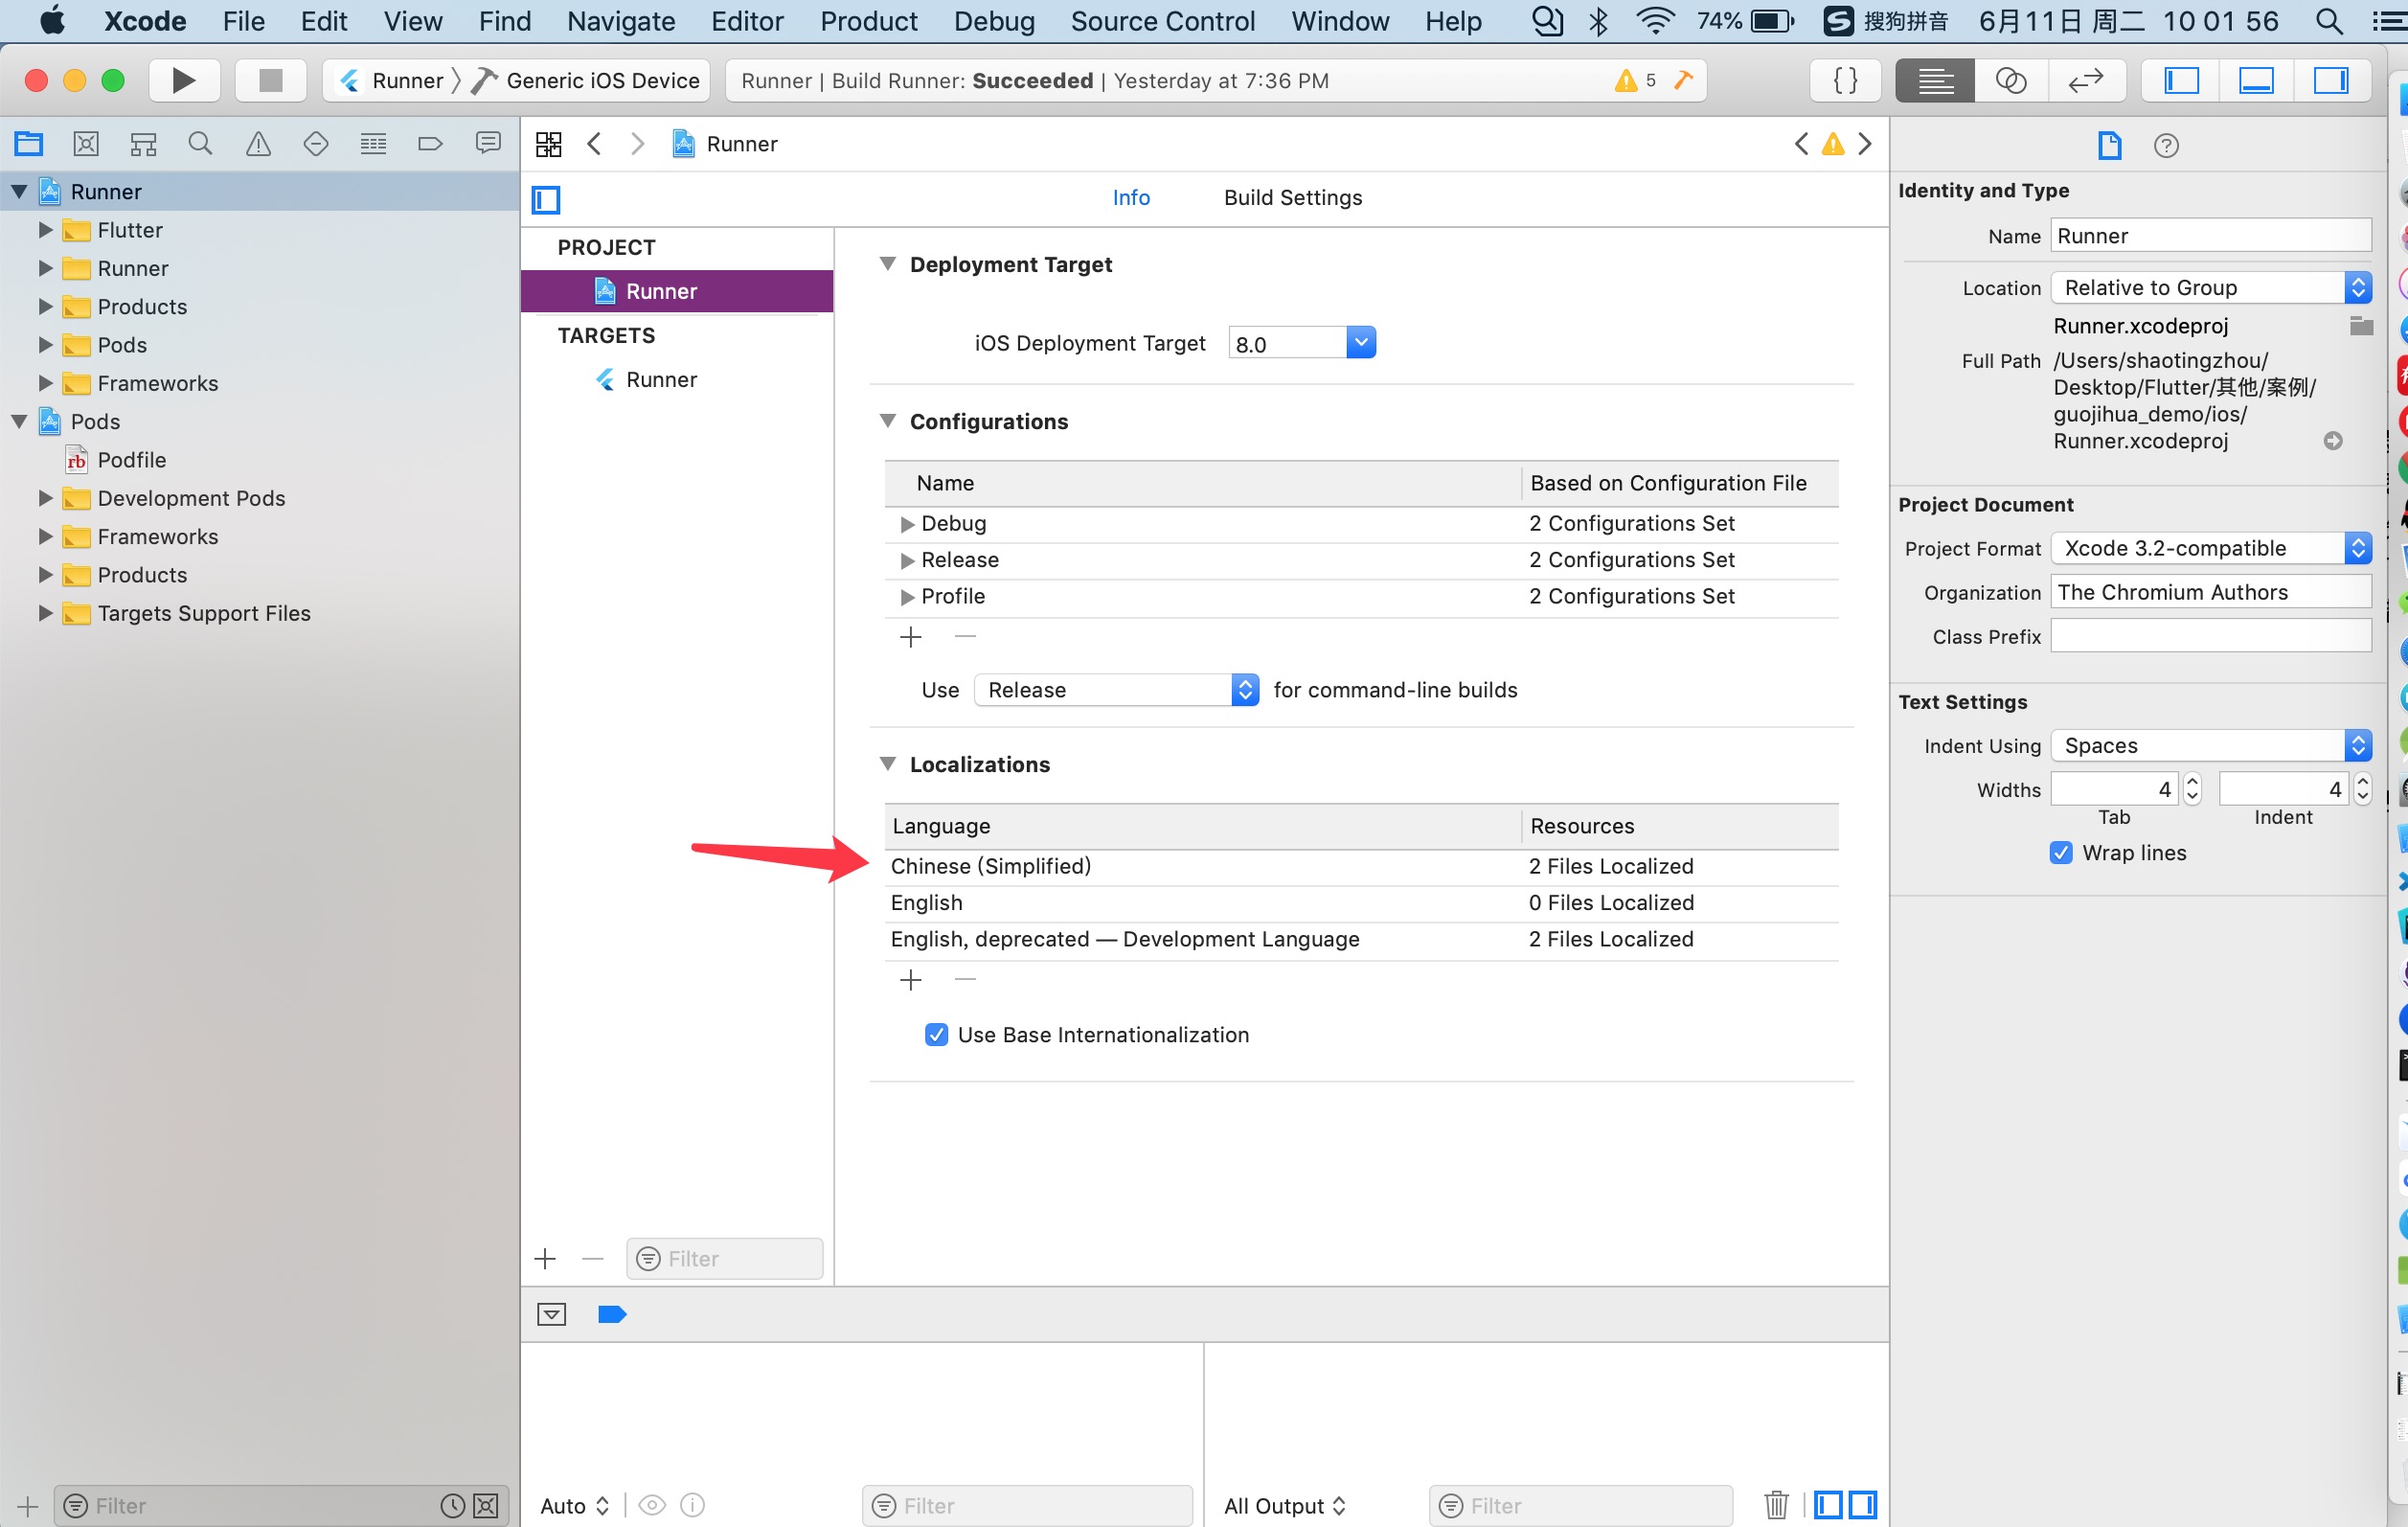
其中,Xcode的多语言也最好跟着配置下文件,如图:
以上就是全部代码了.如果不明白的下面有源码地址,可以去那里看看.源码地址